The power of signals
Your CRM tracks every critical moment in the customer journey — from first contact through closed won, onboarding, renewal, and beyond. By creating a simple Salesforce Flow, you can capture these moments as triggers and automatically enroll contacts into Deeto campaigns. These campaigns engage your leads and customers to understand what happened during the sales journey and why. This guide walks through a complete example: enrolling opportunity contact roles into one of two Deeto campaigns 5 days after an opportunity closes — depending on whether it was Closed Won or Closed Lost.Part 1: Named Credential setup
You must set up a Named Credential to allow Salesforce to call the Deeto CRM API using an API key.Step 1 — Open Named Credentials in Setup
Click the Salesforce gear icon and select Setup. In the Quick Find box, type Named Credentials.
Step 2 — Create a new External Credential
Select External Credentials and click New. Fill in the Label and Name, choose Custom as the Authentication Protocol, and click Save.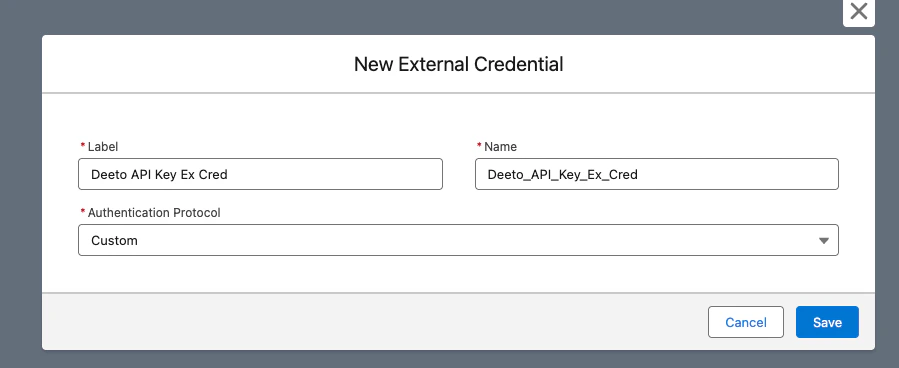
Step 3 — Add the API key header
On the newly created External Credential page, scroll to the Custom Headers section and click New. Create a header with the name X-Deeto-API-Key and enter the API key value provided to you by Deeto, then click Save.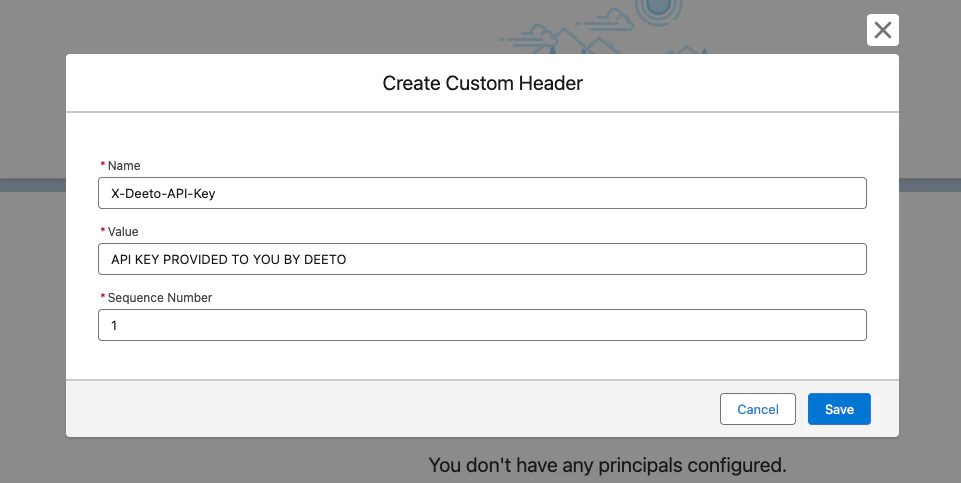
The API key should be 64 characters long. Contact your Deeto Customer Success Manager if you have not received it.
Step 4 — Create a Principal
On the same page, go to the Principals section and click New. Fill in the Parameter Name and click Save.
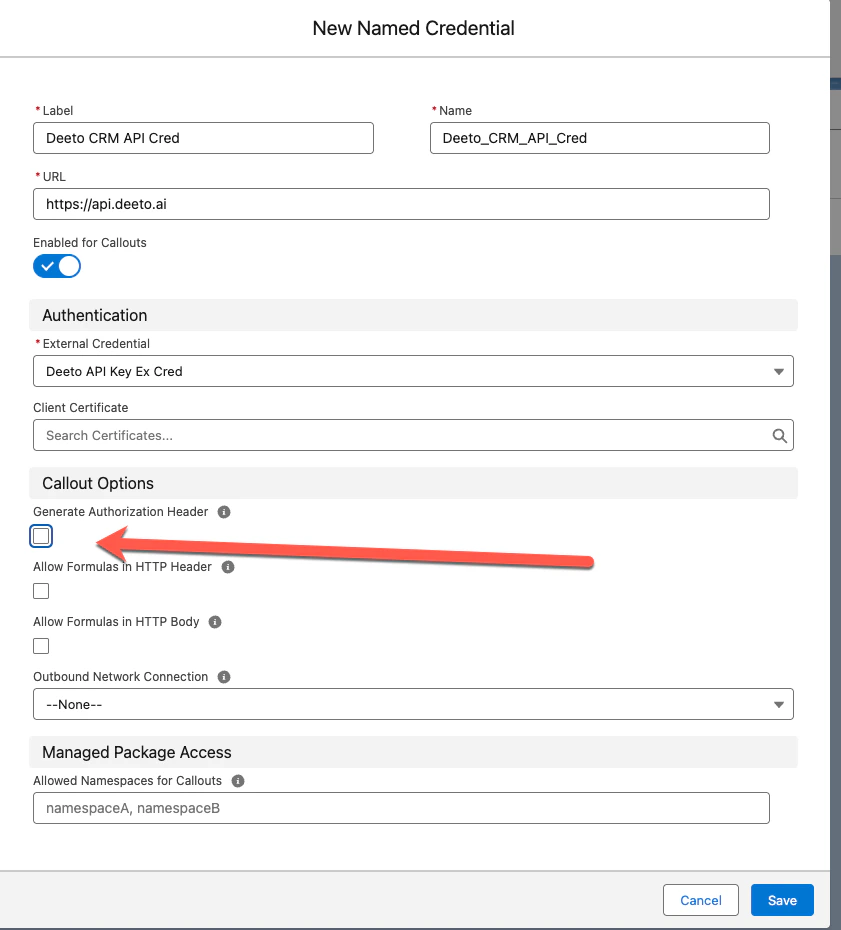
Step 5 — Create the Named Credential
Go back to Named Credentials and select the Named Credentials tab, then click New. Fill in the Label, Name, and URL (https://api.deeto.ai), select the External Credential you just created, and make sure to uncheck “Generate Authorization Header”.
Part 2: Permission setup
You must create a Permission Set that grants users access to the Deeto Named Credential.Step 1 — Open Permission Sets
Click the Salesforce gear icon and select Setup. In Quick Find, type Permission, then click Permission Sets and click New.
Step 2 — Create the Permission Set
Enter a Label and API Name for the Permission Set, then click Save.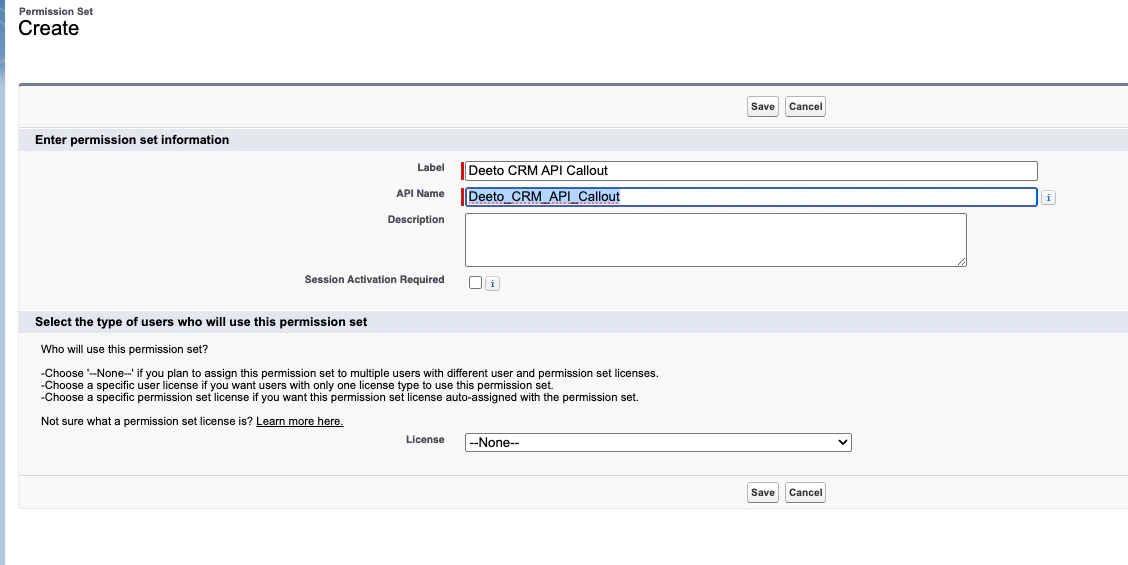
Step 3 — Open External Credential Principal Access
On the Permission Set page, click External Credential Principal Access.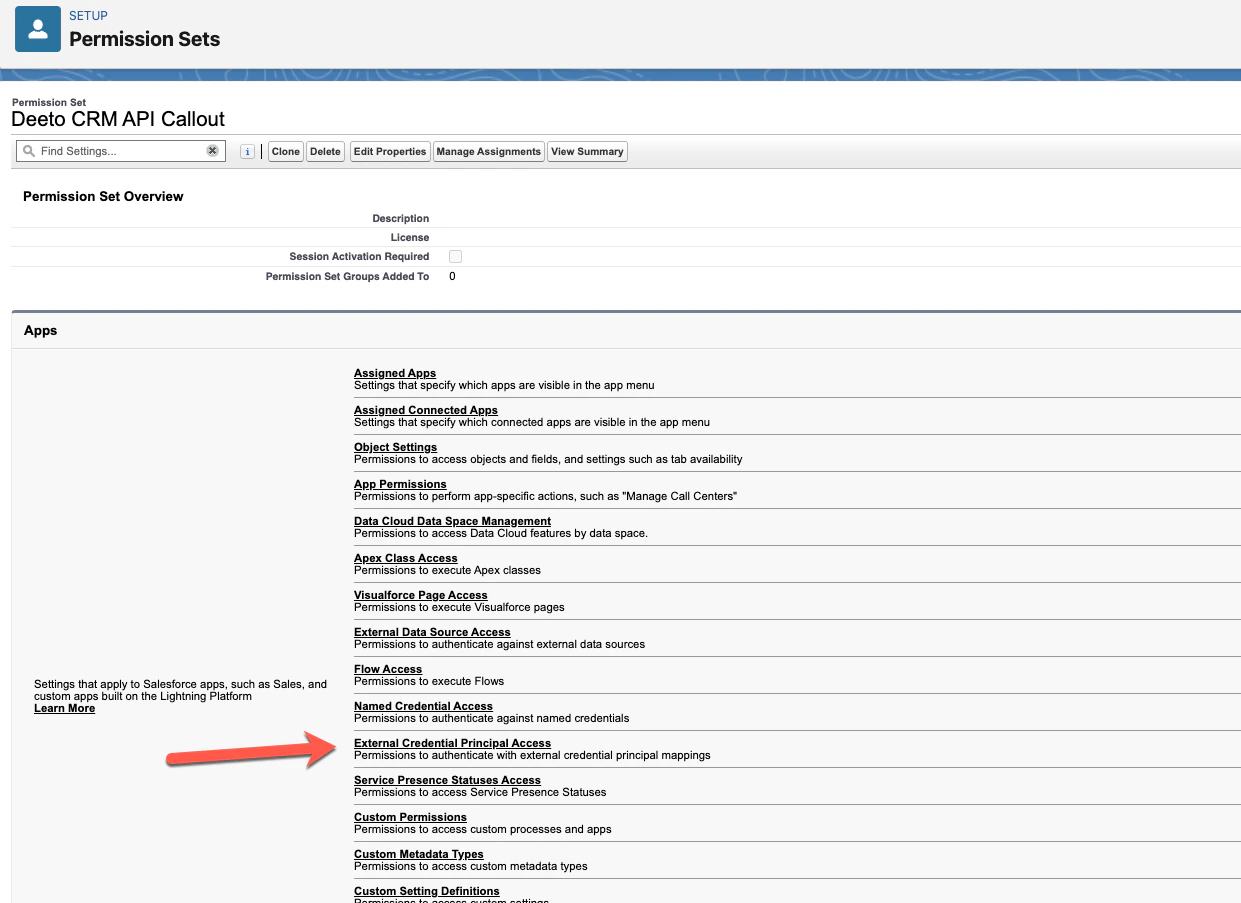
Step 4 — Edit the External Credential Principal Access
Click Edit on the External Credential Principal Access table.
Step 5 — Add the credential
Select the Deeto credential in the left pane and click Add to move it to the right pane, then click Save.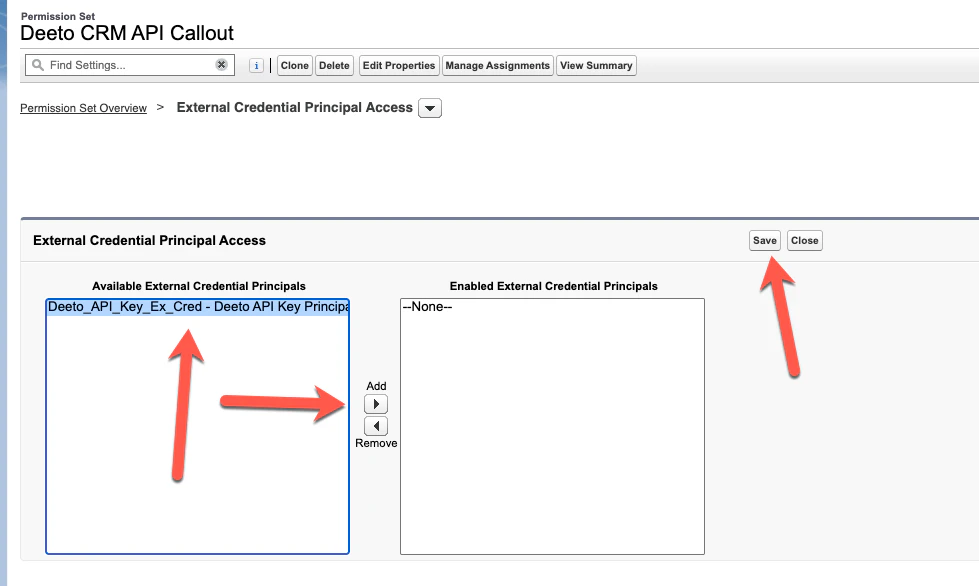
Step 6 — Open Manage Assignments
The credential is now assigned. Click Manage Assignments to assign users.
Step 7 — Add user assignments
Click Add Assignment, select the users who will run automation flows that call the Deeto CRM API, click Next, then click Assign.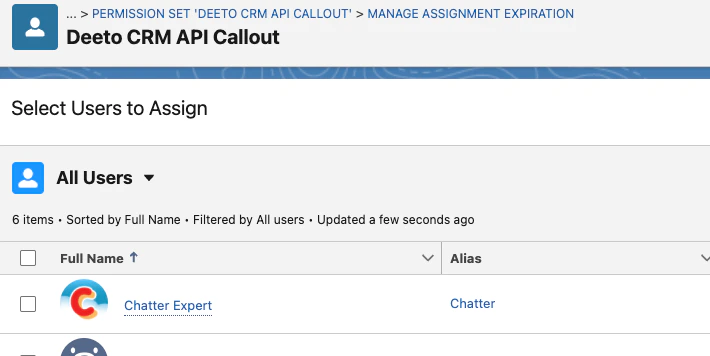
Part 3: Building the automation flow
This section walks through creating a Salesforce Flow that enrolls opportunity contact roles into Deeto campaigns 5 days after an opportunity closes.Before you build — considerations
- Should you filter opportunity contact roles by role type to limit which contacts are enrolled?
- Should you broaden the audience to include all contacts on the opportunity account?
- Are there additional conditions — account size, product line, territory — that should factor into which campaign contacts are enrolled in?
Step 1 — Open Flows in Setup
Click the Salesforce gear icon and select Setup. In Quick Find, type Flows.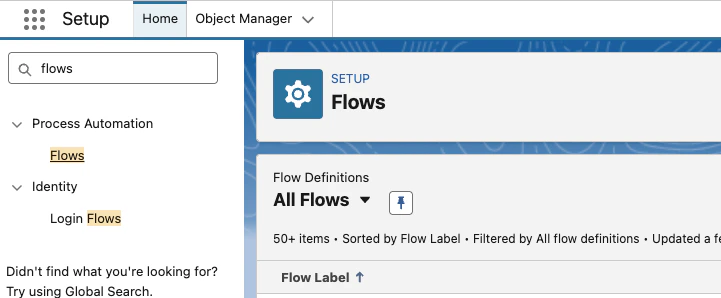
Step 2 — Create a new Record-Triggered Flow
Click New Flow and select Record-Triggered Flow.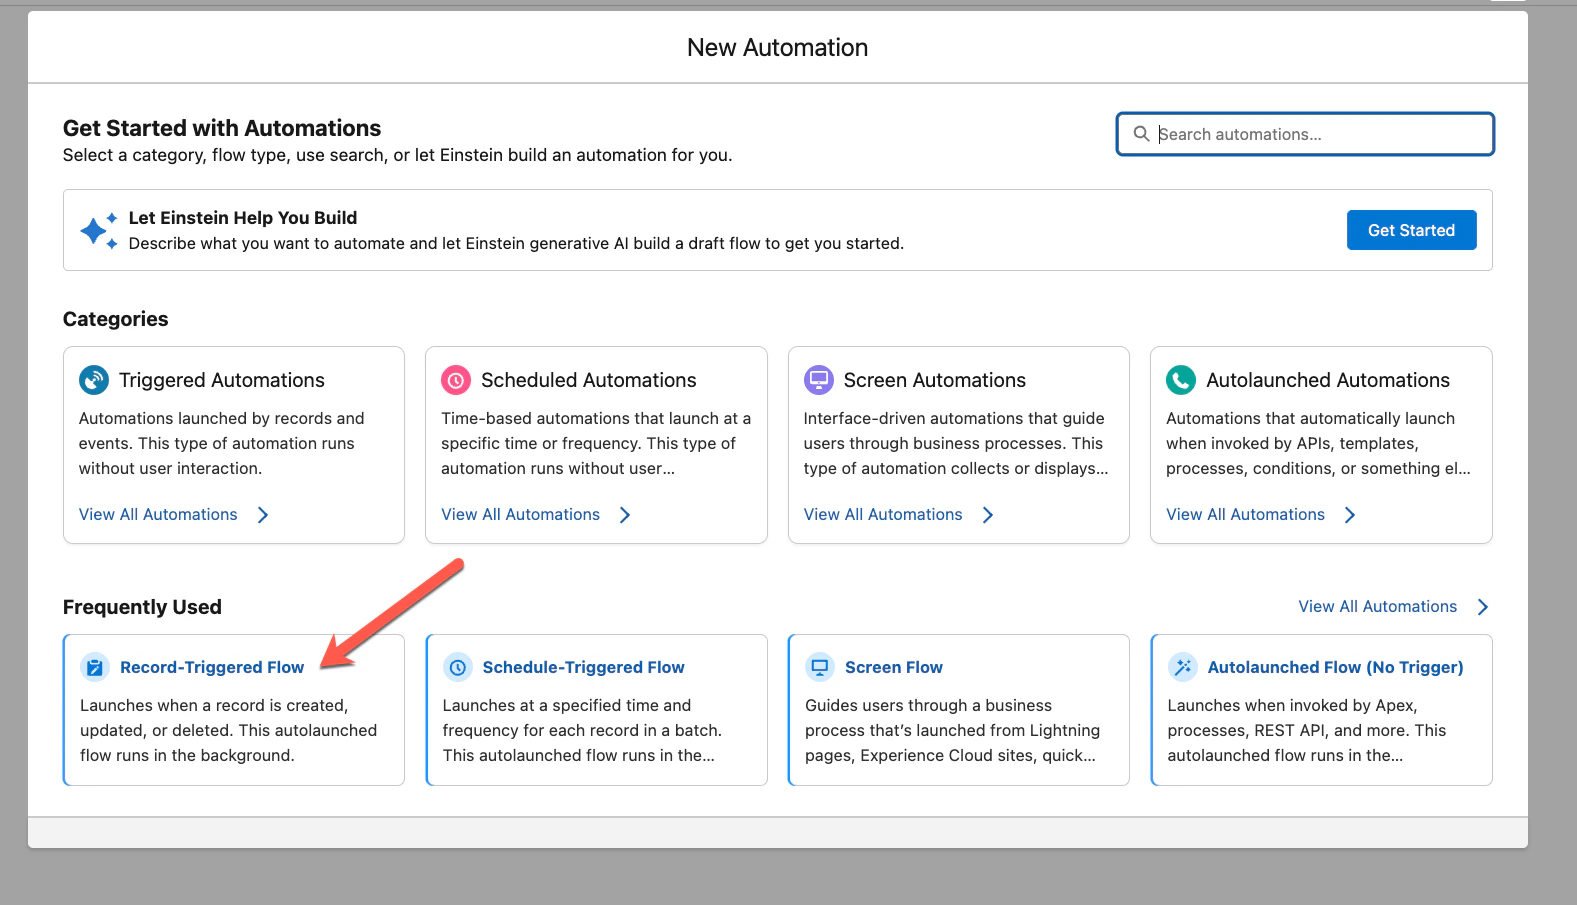
Step 3 — Configure the Start element
Configure the start element to trigger on Opportunity, set the trigger to A record is created or updated, add a condition for Closed = True.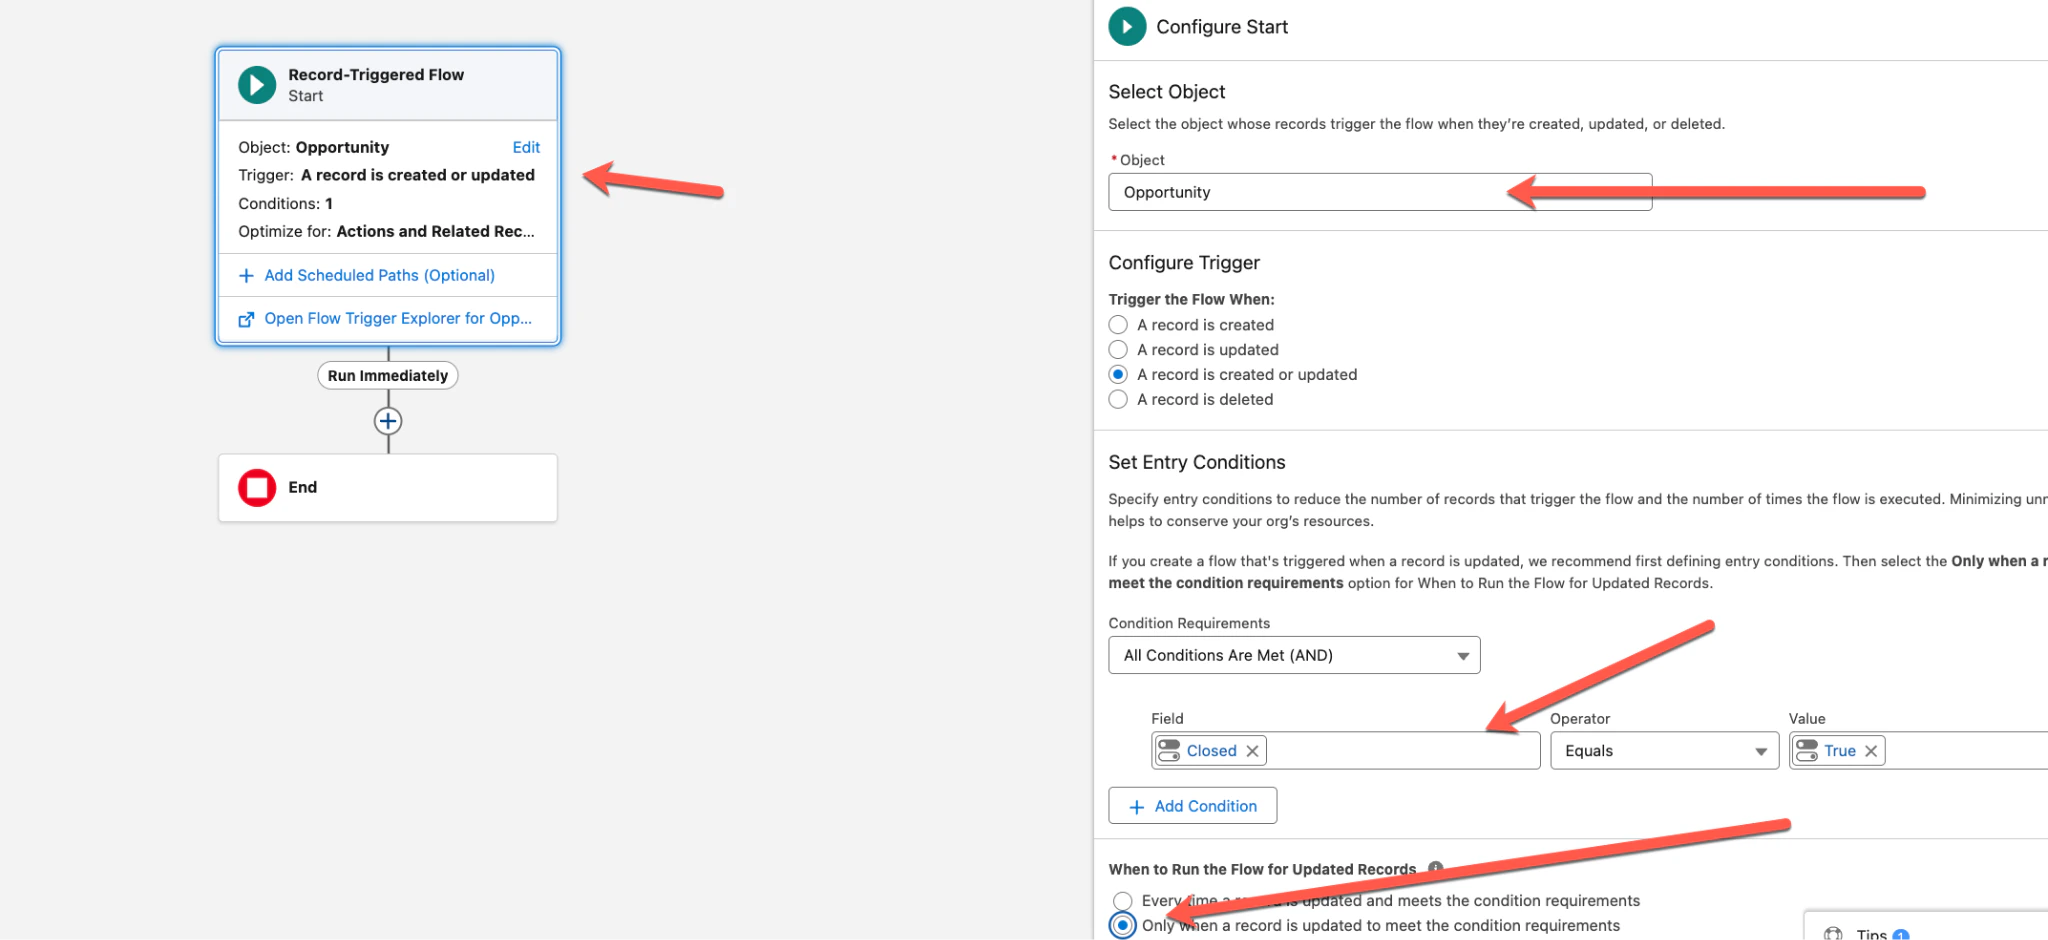
Step 4 — Add a Scheduled Path
Add a Scheduled Path set to run 5 Days After Close Date.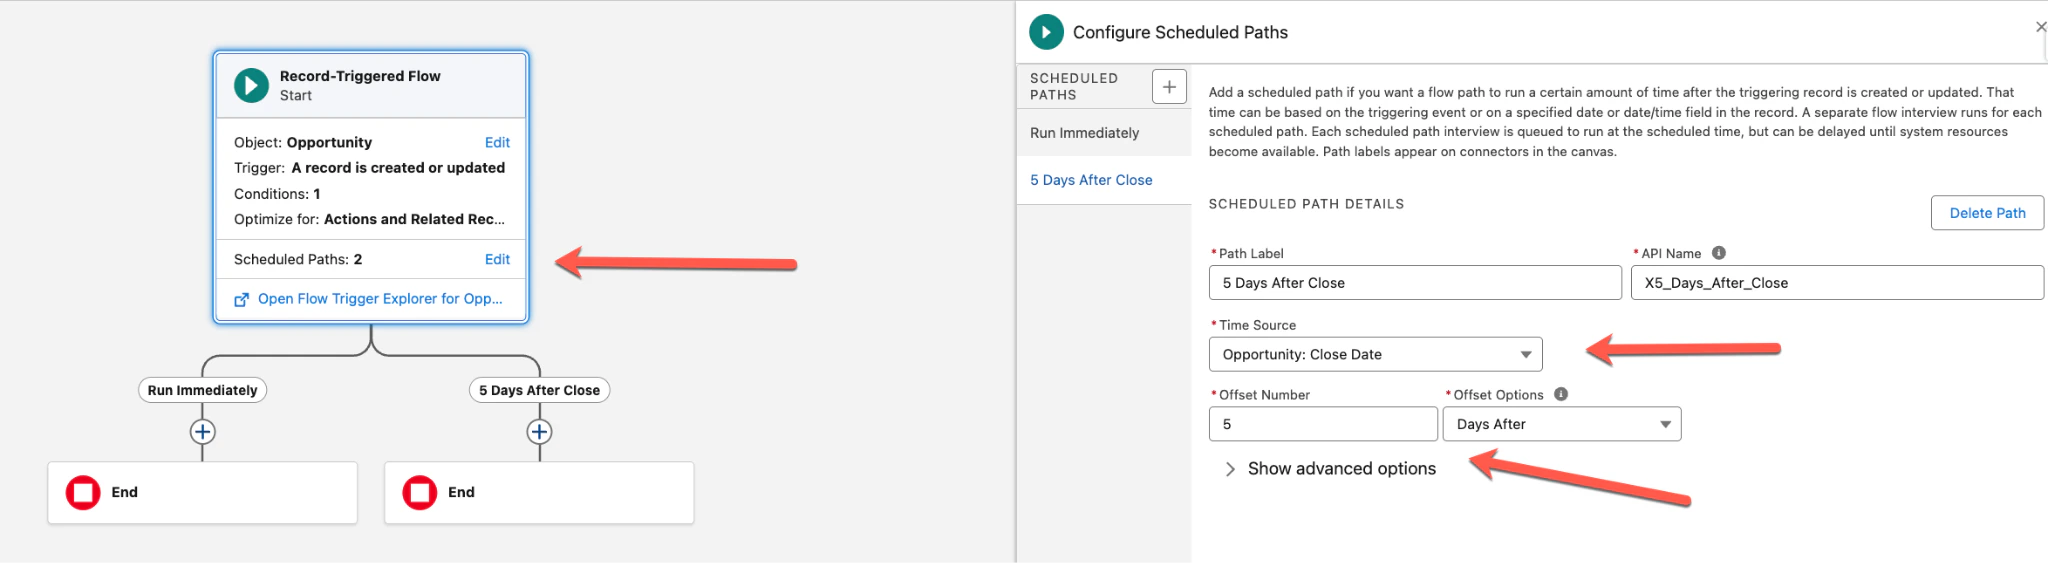
Step 5 — Click + and select Action
Click the + button under the 5 Days After Close path, then select Action from the Add Element panel.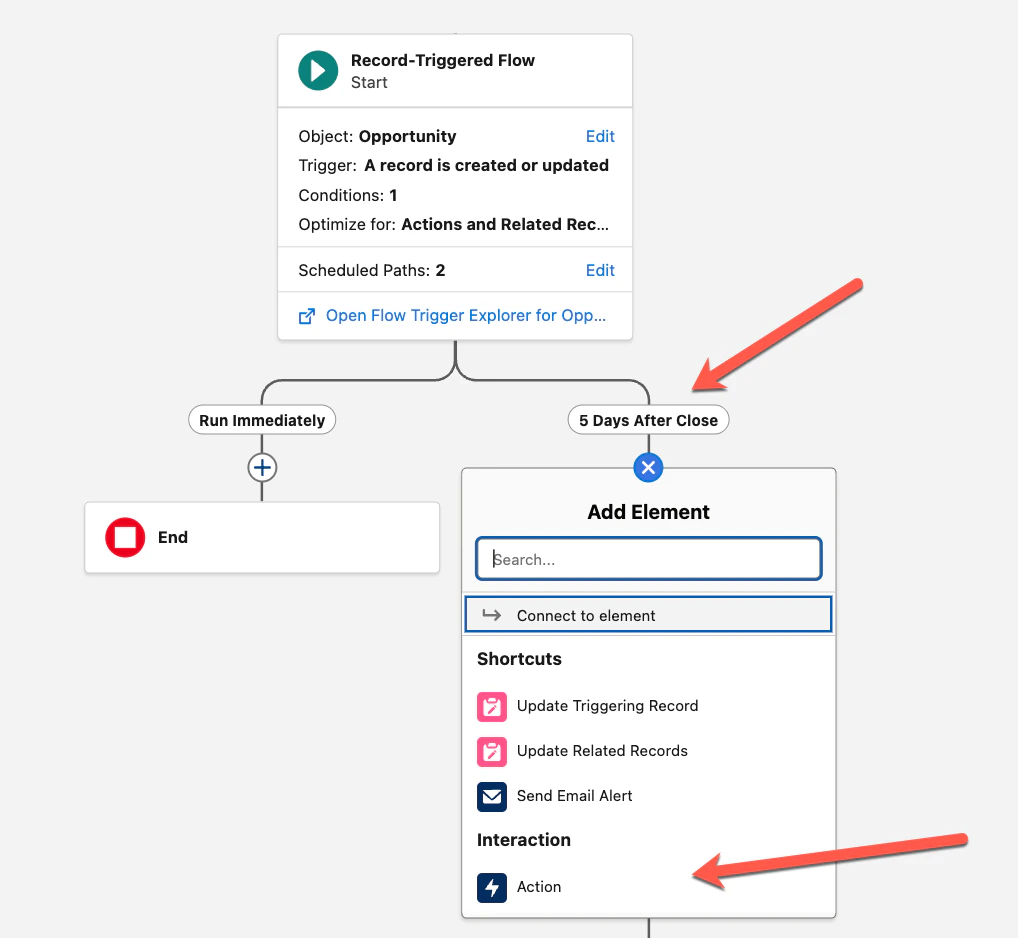
Step 6 — Click Create HTTP Callout
In the Search Actions panel, scroll to the bottom and click Create HTTP Callout.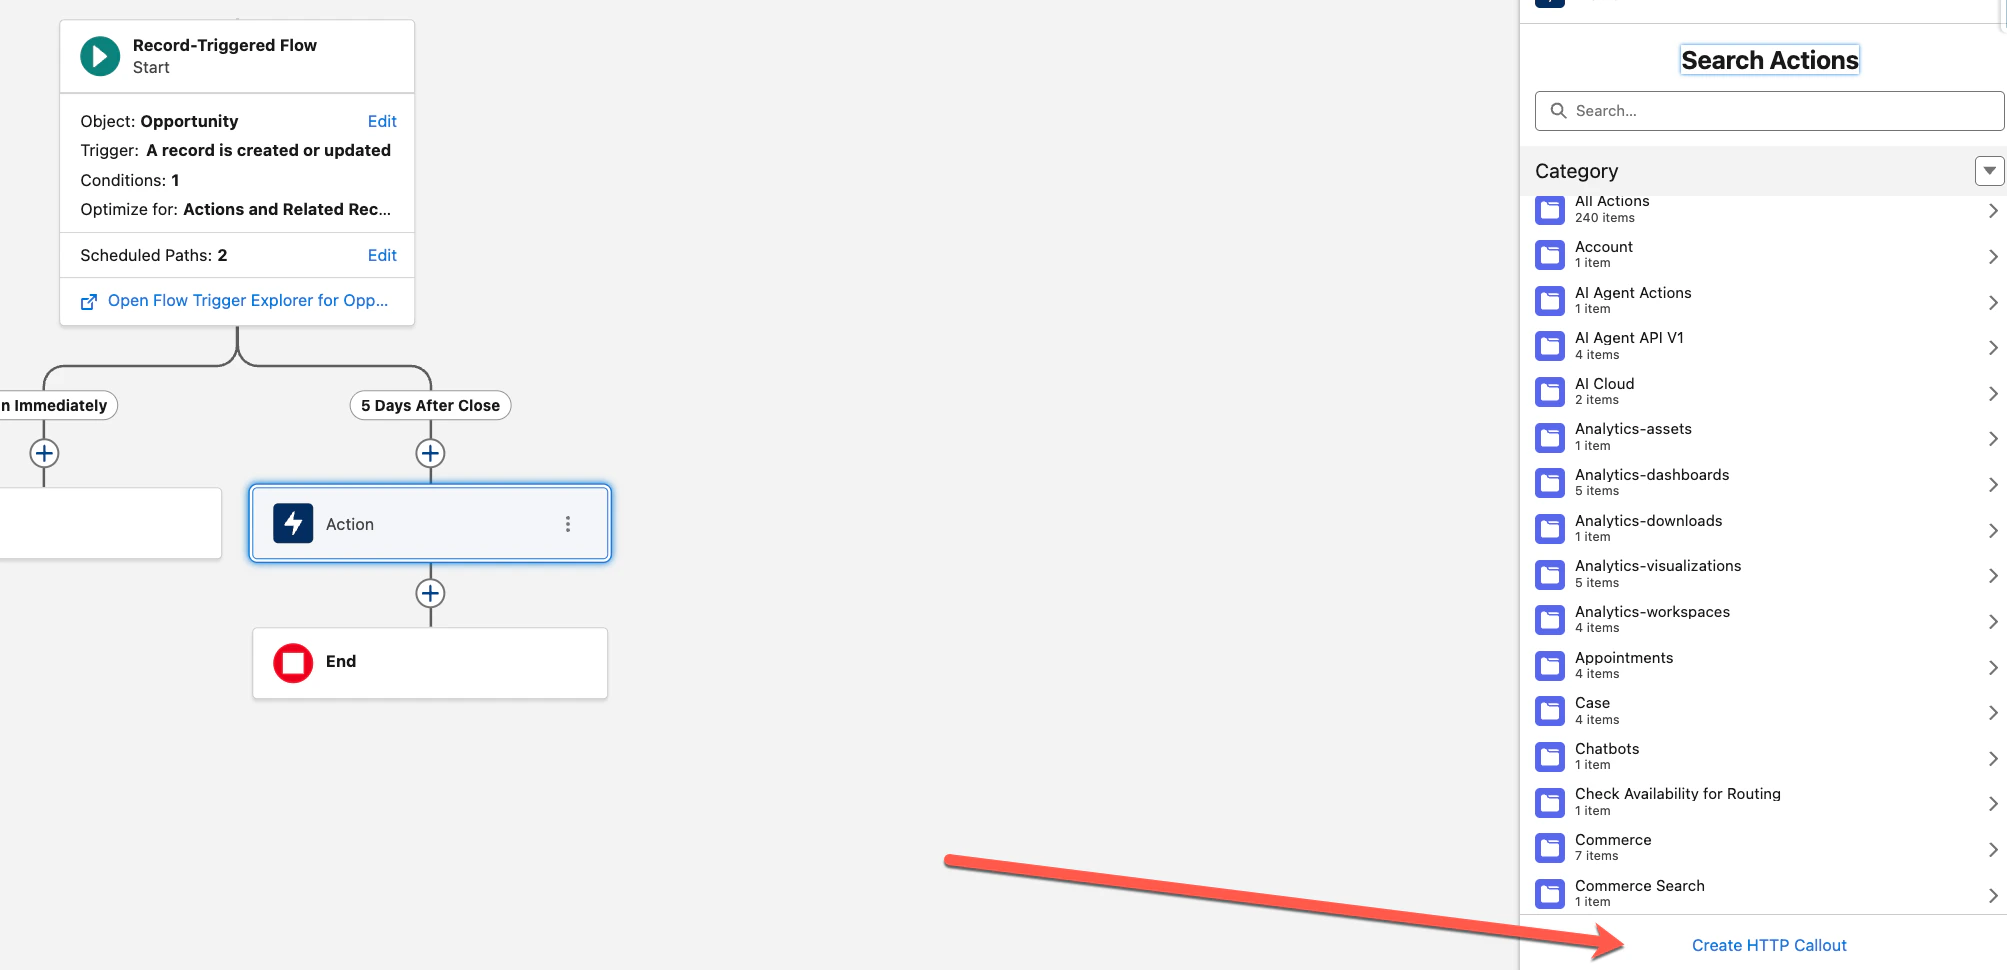
Step 7 — Enter service name and choose Named Credential
Enter the service name DeetoWebhookTrigger, select the Named Credential Deeto CRM API Cred from the dropdown, then click Next.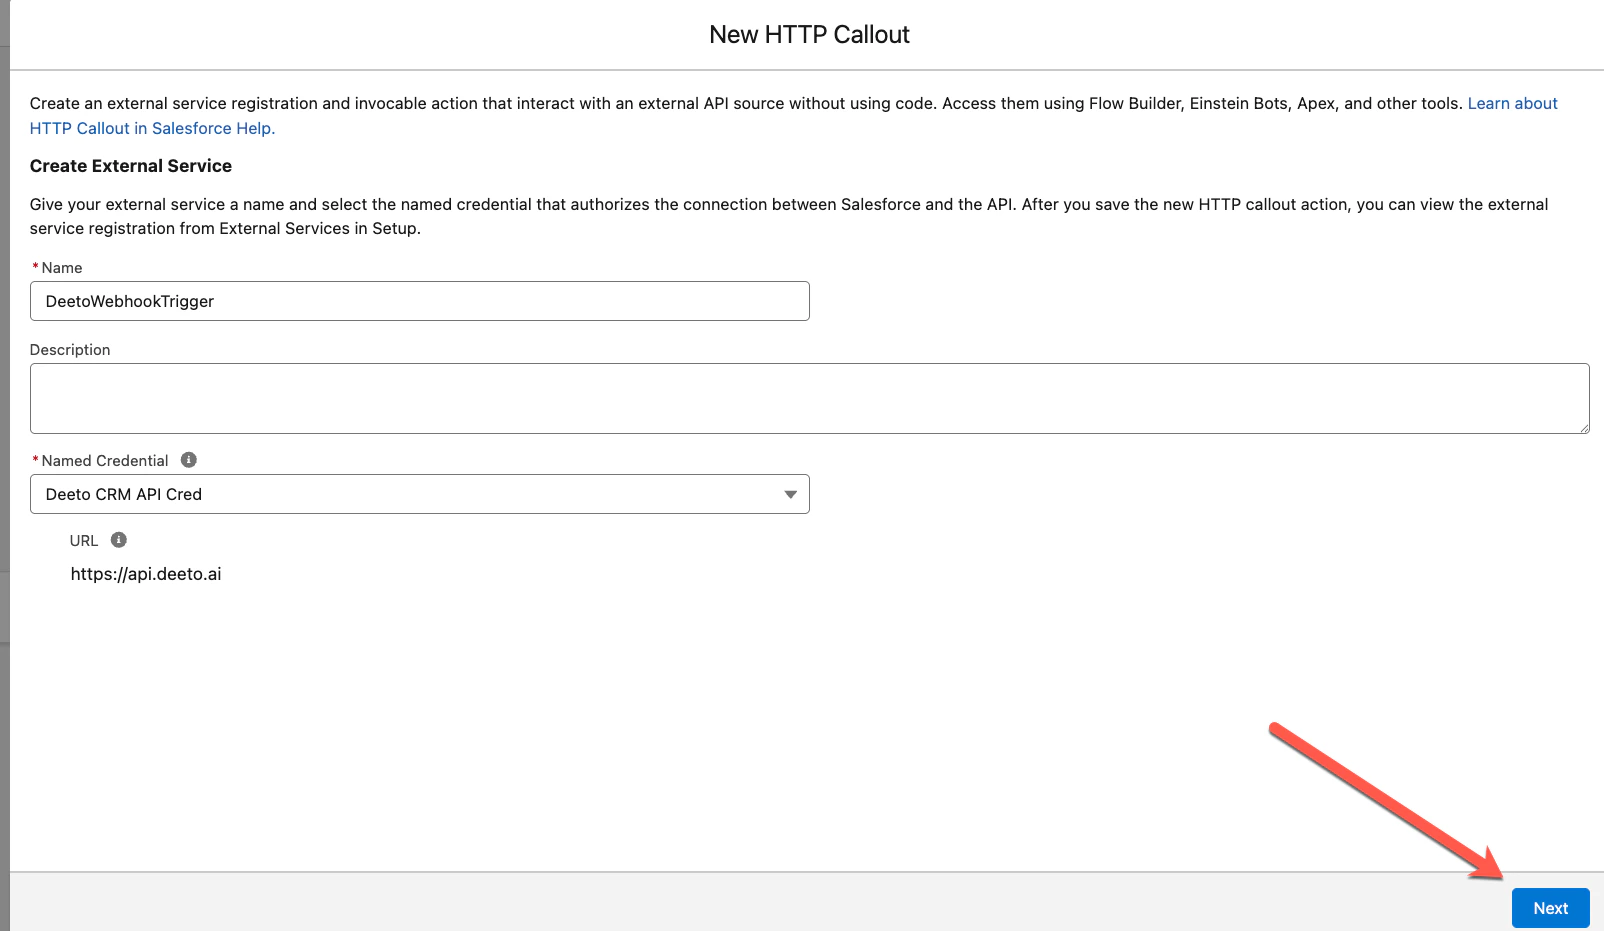
Step 8 — Configure Label, Method, and URL Path
Enter the Label Deeto Webhook Trigger, set Method to POST, and set the URL Path to/v1/salesforce/update2, then click Next.

Step 9 — Enter the Sample JSON Request
Paste the Sample JSON Request below into the request body field, click Review (the Data Structure section will auto-populate), then click Next.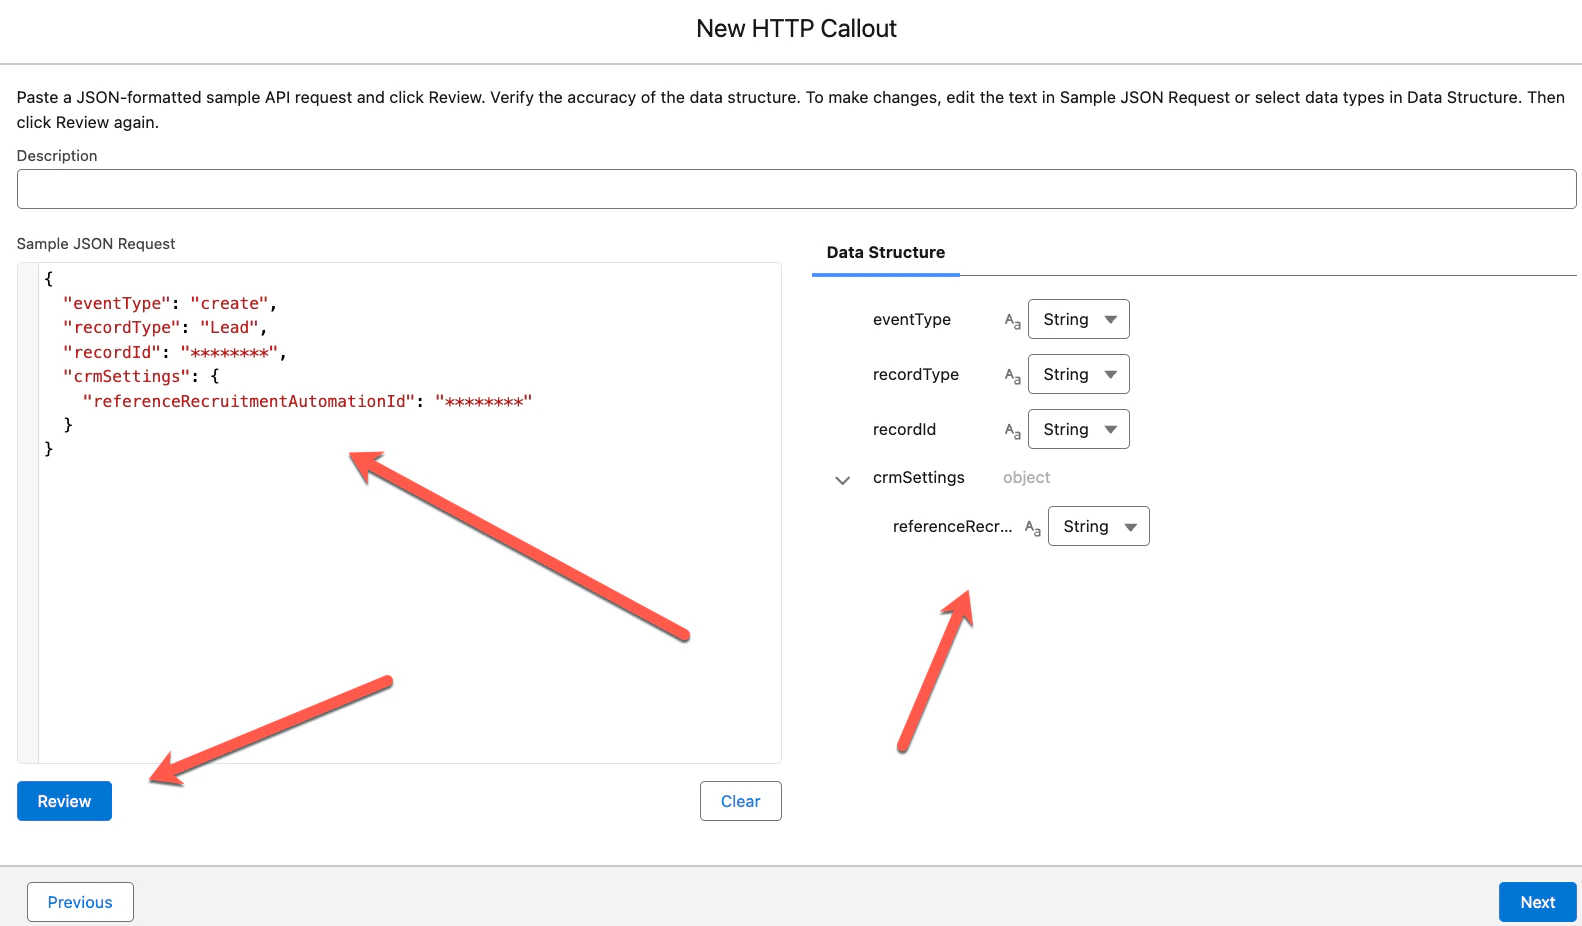
Step 10 — Select Use Example Response
Select Use Example Response and click Next.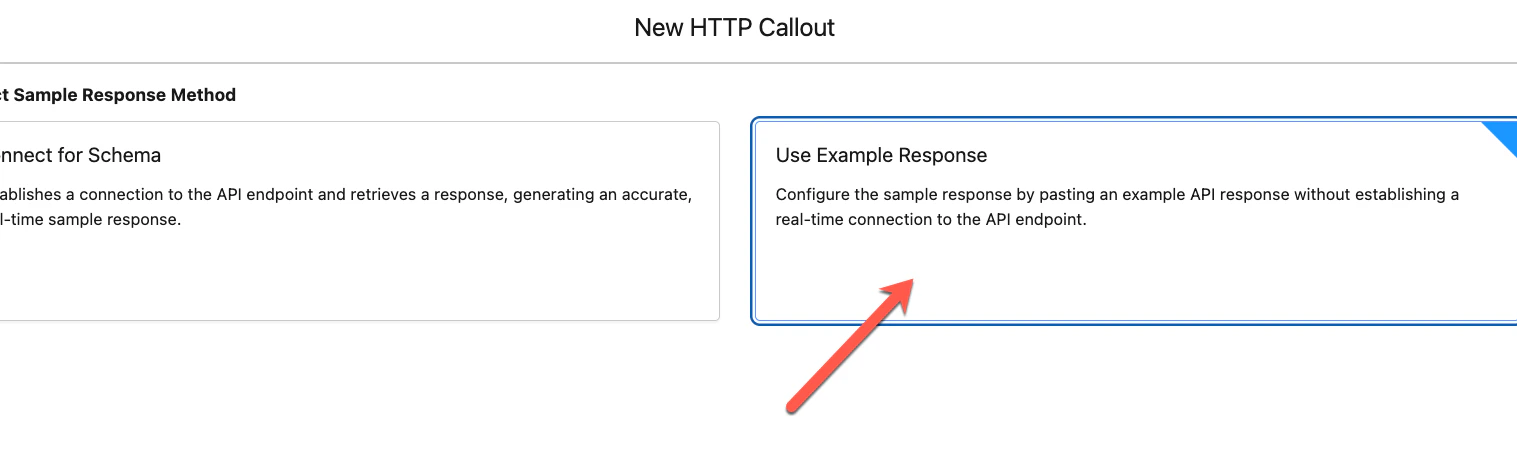
Step 11 — Enter the Sample JSON Response
Paste the Sample JSON Response below, click Review (the Data Structure section will auto-populate), then click Save.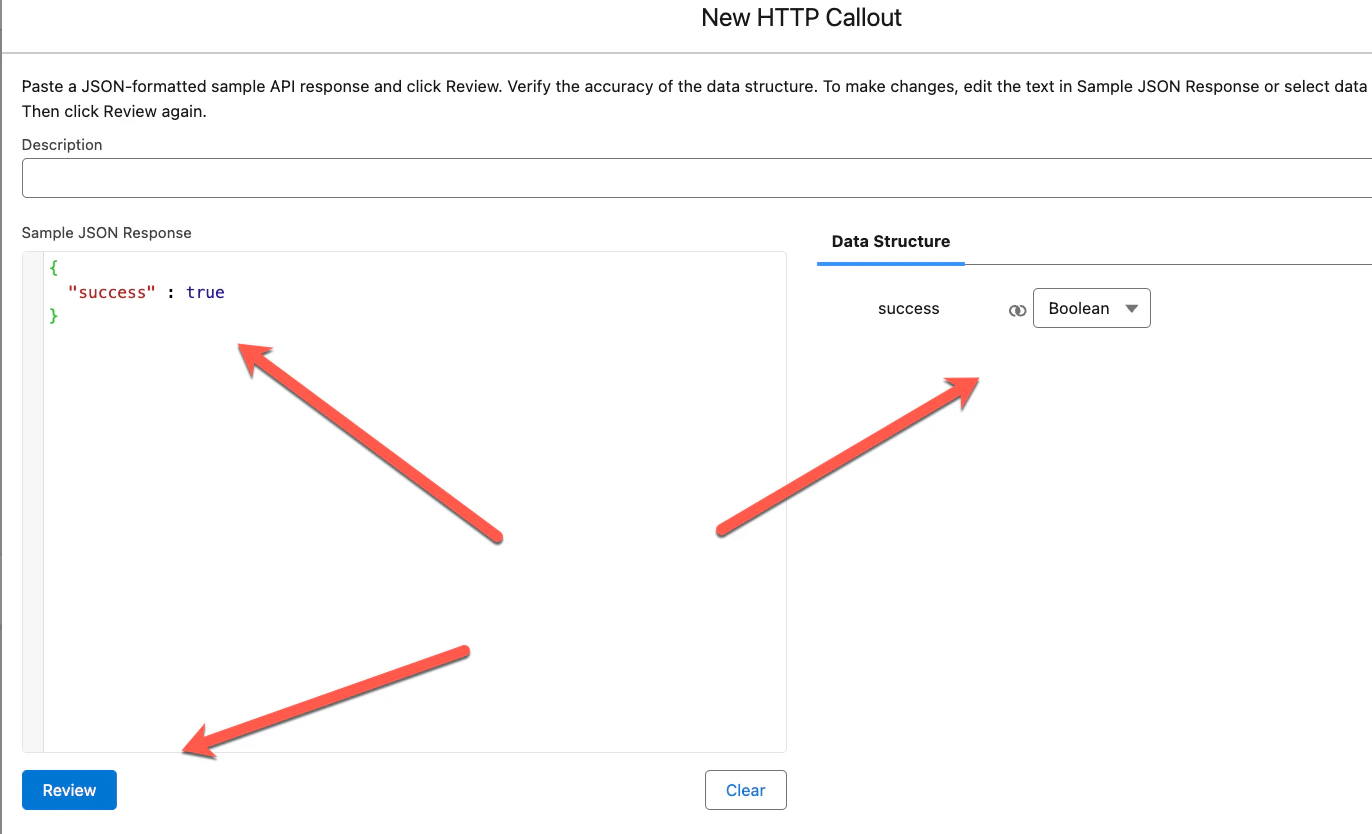
Step 12 — Configure the callout Label, API Name, and Value
The callout action now appears in the right pane. Fill in the Label and API Name, then click in the Value field and select + New Resource.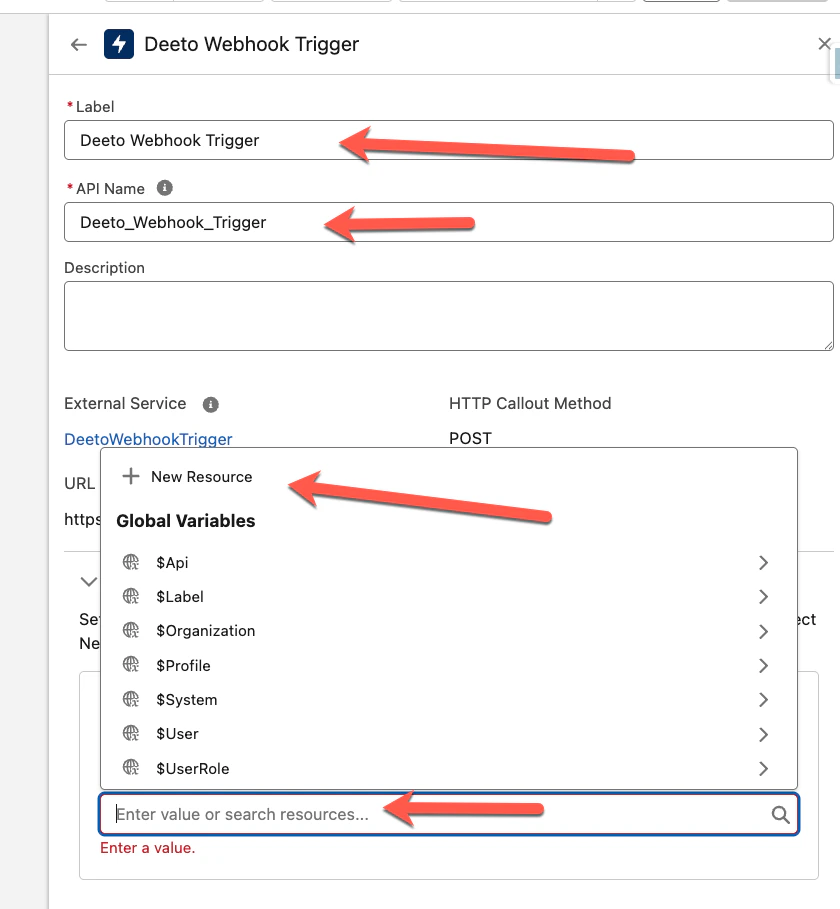
Step 13 — Complete the New Resource
In the New Resource dialog, enter the API Name DeetoWebhookPayload, set the Data Type to Apex-Defined, and click Done.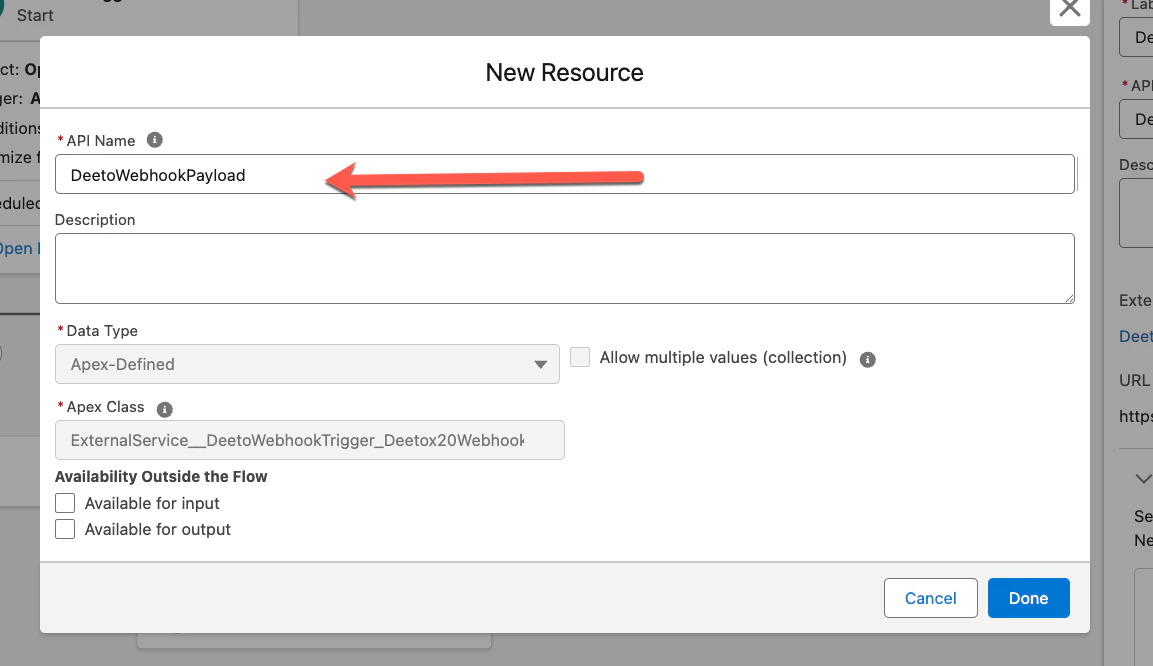
You have now completed the construction of the Deeto callout action. This callout is required for any flow that enrolls a contact into a Deeto campaign.
Step 14 — Add Get Records for the Account
Add a Get Records element to retrieve the related Account from the triggering opportunity.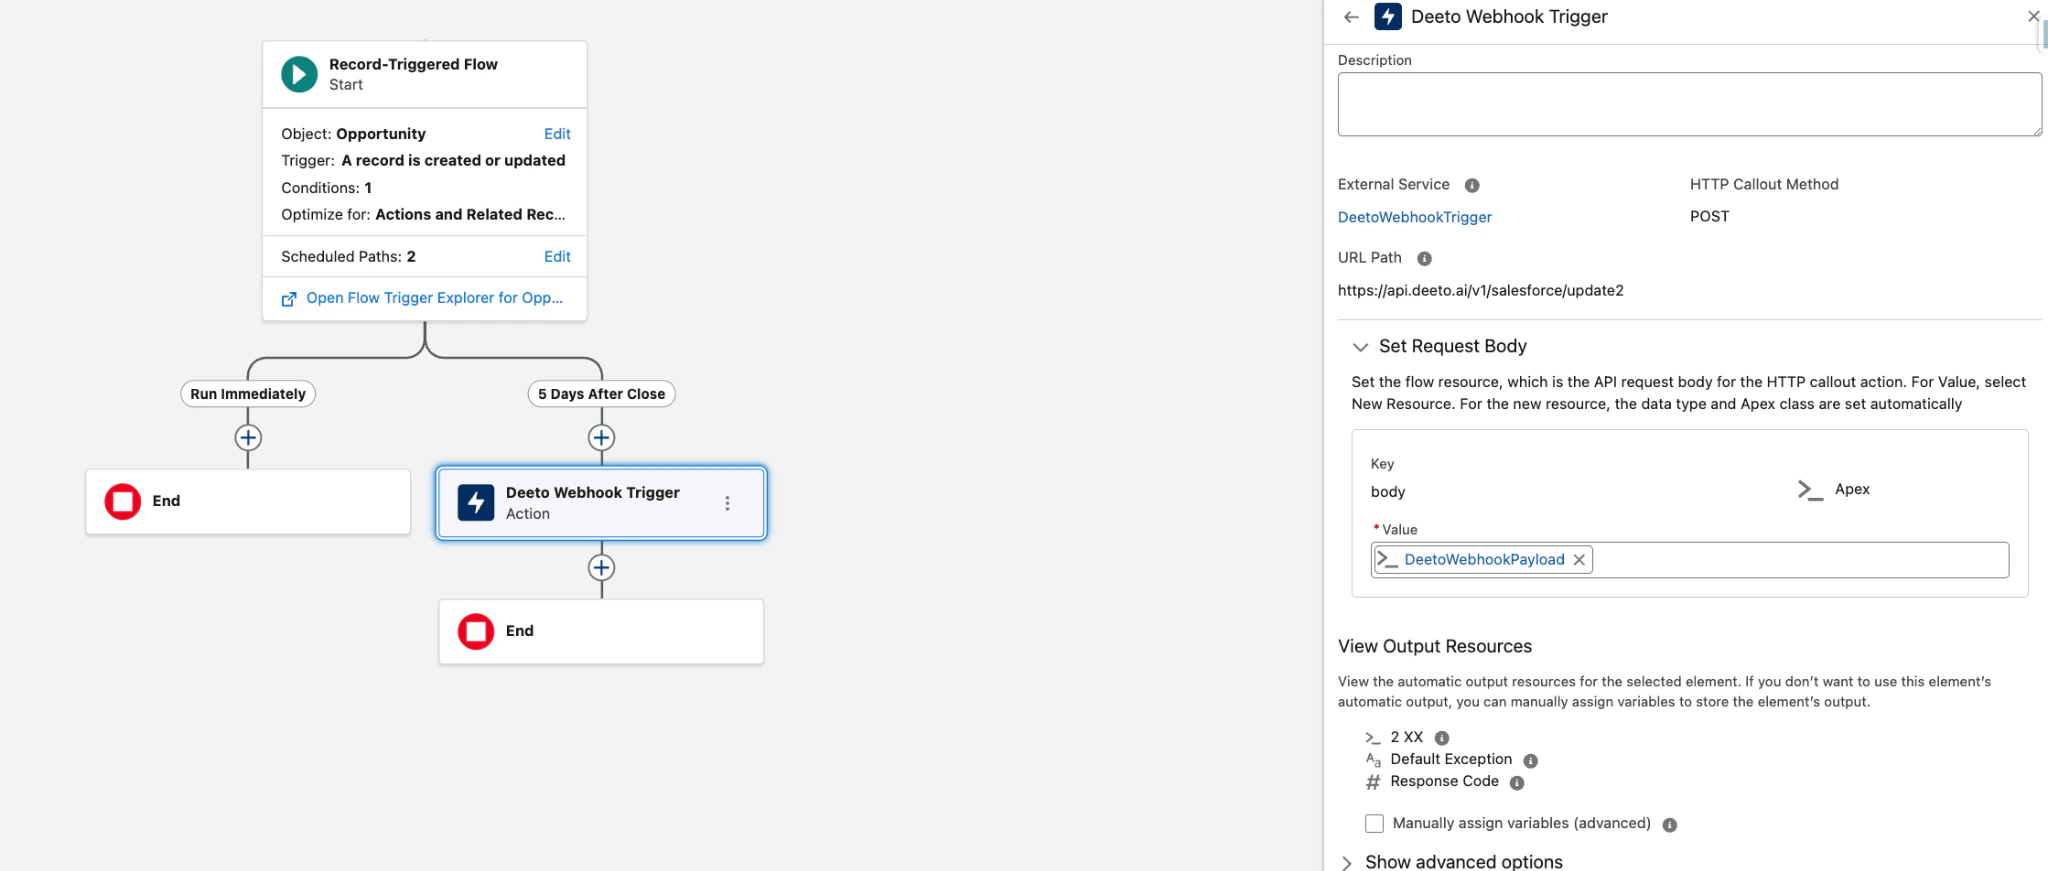
Step 15 — Add Get Records for Opportunity Contact Roles
Add another Get Records element to retrieve all Opportunity Contact Roles from the triggering opportunity.
Step 16 — Add a Decision element
Add a Decision element to branch the flow based on whether the opportunity was Closed Won or Closed Lost.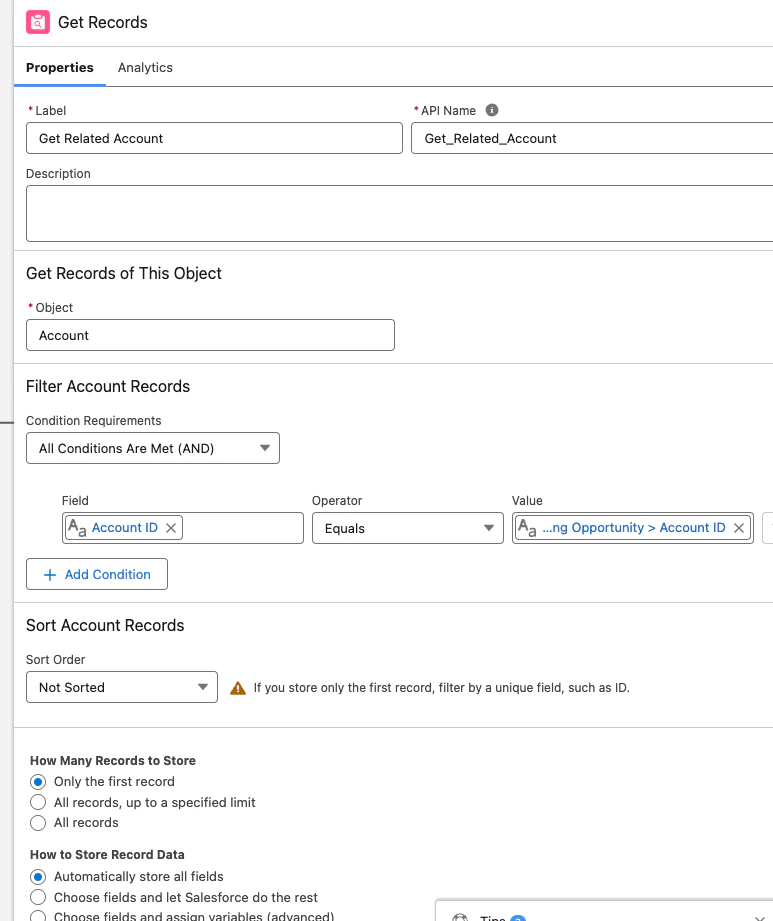
Step 17 — Add Assignment nodes for Campaign IDs
Add an Assignment node on each branch to set the correct Deeto Campaign ID variable based on the outcome.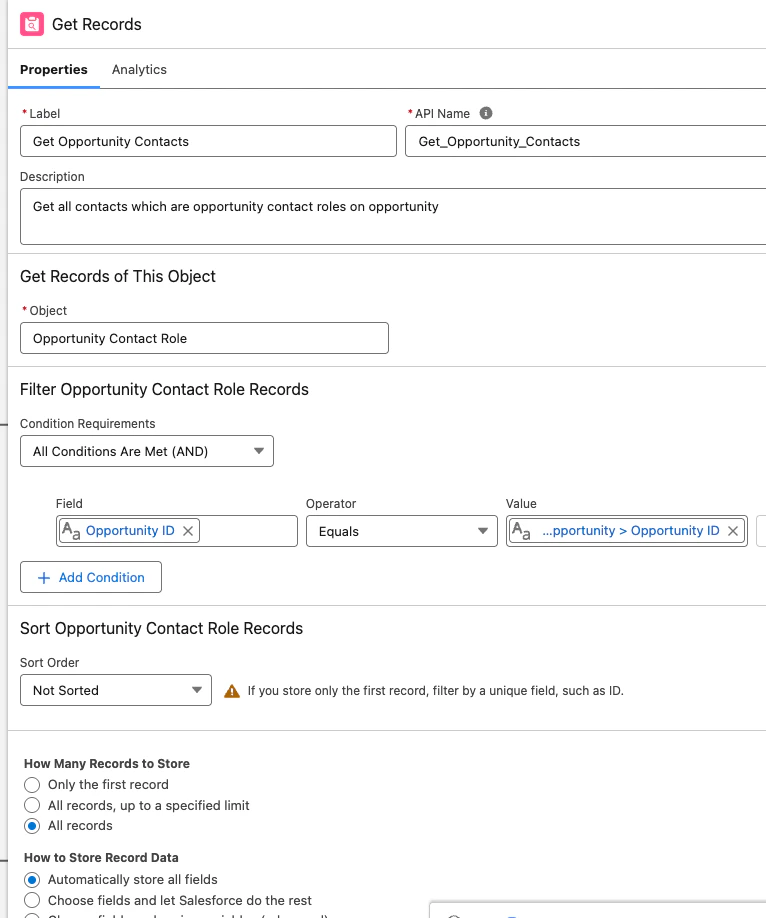
Step 18 — Add the Loop element
Add a Loop element to iterate through each opportunity contact role record.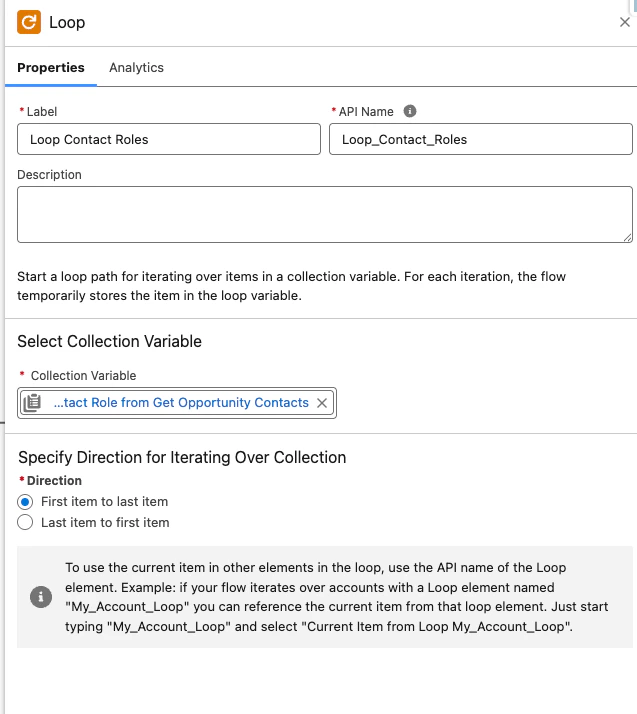
Step 19 — Add Get Records for Contact inside the loop
Inside the loop, add a Get Records element to retrieve the full Contact record for each contact role.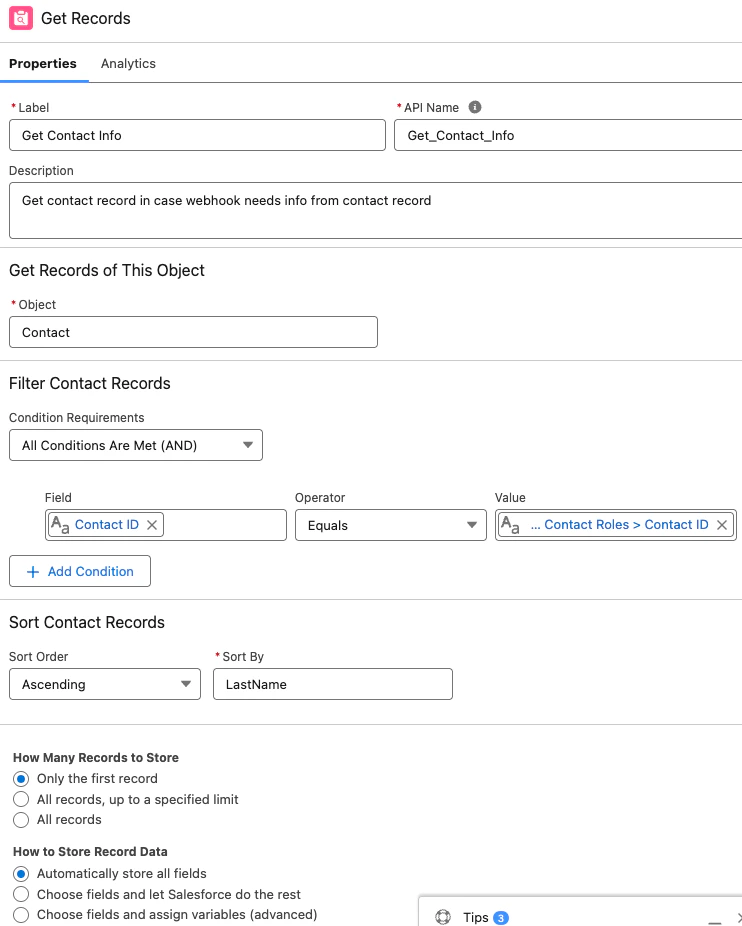
Step 20 — Set payload values
Add an Assignment node to populate the required payload values for the Deeto callout.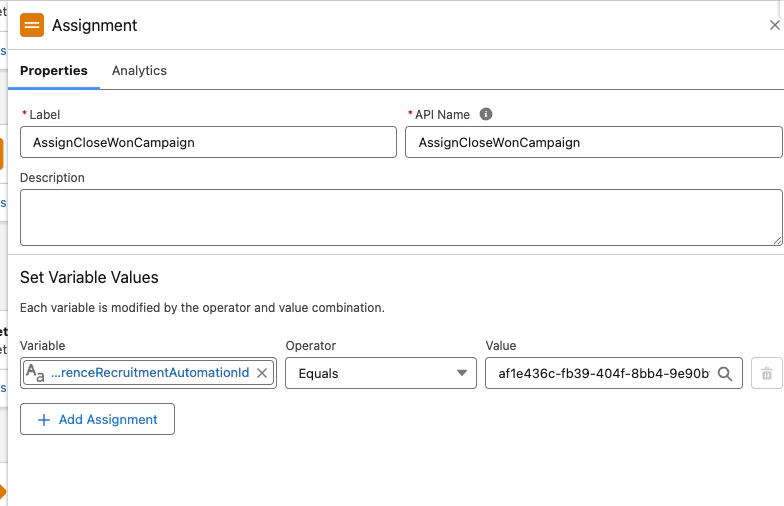
Step 21 — Add the Deeto callout action inside the loop
Add the Deeto callout action you created in Step 13. This is the final step inside each loop iteration.
Step 22 — Review the completed flow
Your flow now handles the full enrollment logic. Review the complete flow structure before activating.
Step 23 — Find your Deeto Campaign API link
In Deeto, navigate to the campaign you want to enroll contacts into, and copy the Campaign API link. You will use this in the Assignment node to set the campaign ID variable.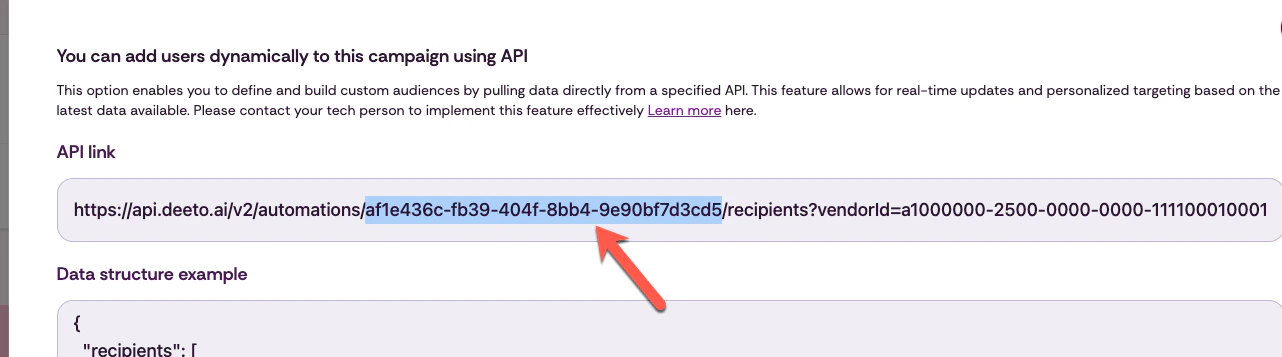
Step 24 — Configure the Assignment for Closed Won
In the Assignment node for Closed Won, paste the Closed Won campaign API link into the campaign ID variable.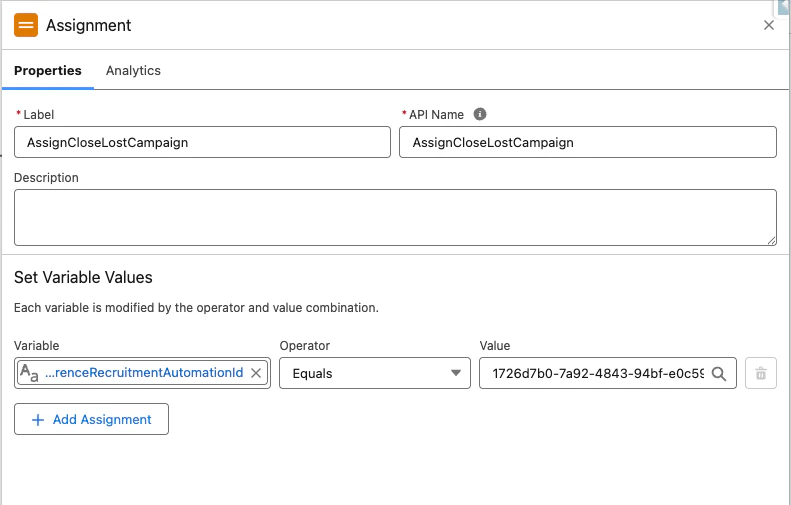
Step 25 — Configure the Assignment for Closed Lost
In the Assignment node for Closed Lost, paste the Closed Lost campaign API link into the campaign ID variable.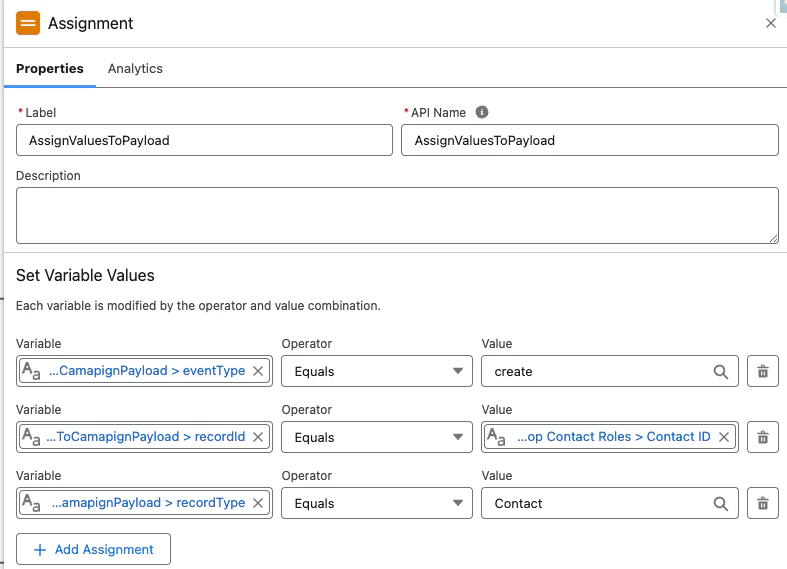
Step 26 — Add the final callout action Label and API Name
Give the Deeto callout action inside the loop a Label and API Name, then save.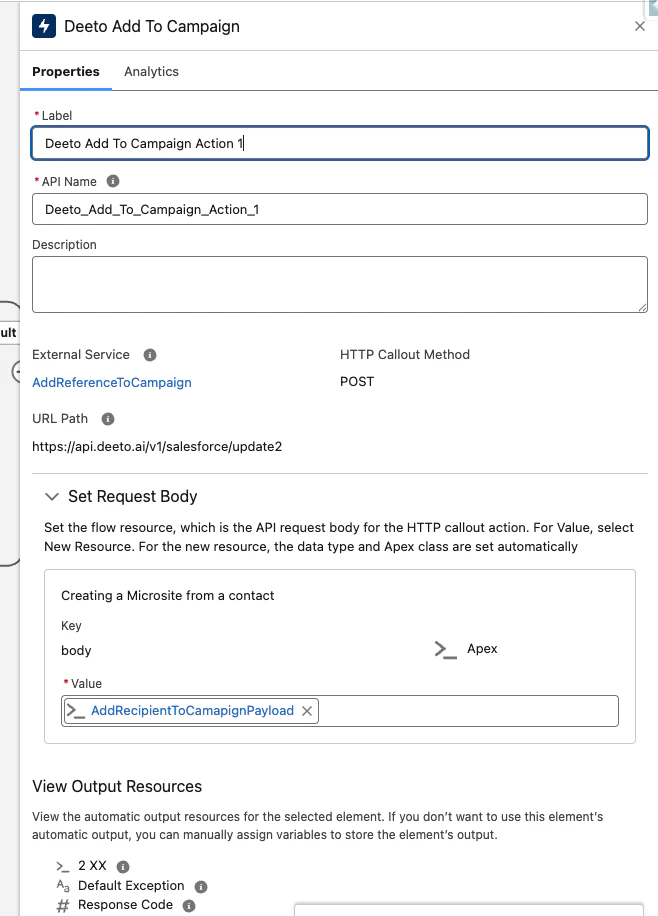
Step 27 — Save and Activate
Click Save in the flow builder, then click Activate. Your flow is now live and will automatically enroll contacts into Deeto campaigns 5 days after an opportunity closes.Congratulations — you have completed your flow. Reach out to your Deeto Customer Success Manager if you have any questions or issues.
Support: Contact your Deeto Customer Success Manager or email support@deeto.ai.